

Hey guys, so here is a remote start/alarm DIY on my Si Coupe. I used a Viper 5901 (5704) along with the smart start addon (VSM200) to control from my phone. To bypass the immobilizer, I used an Audiovox FLCAN. I'll be a thorough as possible, there are a couple pics I forgot to snap along the way, as well as things I might forgot to mention, so please let me know if you need a picture of something or need me to explain something differently.
Before I start, Honda uses a CAN HIGH and CAN LOW system in the vehicle. This is awesome in the remote start installation world, because a product like the FLCAN is going to control a lot of the features using the cars data system vs. having to hardwire all of your connections into the vehicle. The FLCAN will work on any vehicle, it just needs to be loaded will firmware before it is programmed to the car.
Here is a link to the audiovox website, straight to the 2012 civic diagram. This diagram will work for any 2012 civic model, but there are a couple things that are actually incorrect that I had to figure out on my own, which I'll explain. FlashlogicWeblink
just click on the 'Guide' link under the FLCAN to view it. When you click on the link and view the PDF, you'll be referencing pages 5 and 6, as well as 7 for programming. As you can see, this product makes everything IMMENSELY easier. The FLCAN is going to control your locks, trunk release, arming and disarming the factory alarm, your door, hood, and trunk pins for the alarm, brake and e-brake (e-brake connection only needed for a manual transmission), as well as tachometer. IMPORTANT - tachometer is REQUIRED for a successful installation on a manual transmission - the viper MUST know when the vehicle is started. Automatic transmissions can get by with a virtual tach or a voltage sense, but I would strongly recommend using tach anyways, its only one extra wire and it provides the most accurate engine RPM monitoring vs using an alternative. Also, there are two different methods of installation - Data to Data (D2D) and Wire to Wire (W2W). D2D meaning the FLCAN and viper can talk to each other and control almost everything by plugging in a single harness between the two. W2W is connection each wire individually from the viper to FLCAN. In my personal experience, W2W is much more reliable. It is a lot of extra work, but the success rate is much much higher if done correctly. Data can sometimes fail or not send information back and forth quickly enough, resulting in it not working or acting funky. Choose what you wish, but for piece of mind I would encourage going W2W. So, I will finally begin:
First off, here is my little lady at the dealership, drove it away with 1 mile on it")
![]()
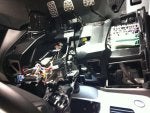
Alright so you'll need to remove the driver side under dash and the steering wheel shroud. The dash is held in by clips, start at the bottom and work your way around, the last clips being the ones closest to the driver door. To remove the shroud, pull it out as far as you can, look under, and remove a silver phillips screw. After that, remove the top half and you'll see the bottom half is held in by two screws, one on each side of the wheel. Remove each one and the shroud will come right off. Here is a pic of what you'll see when youre done. On the Si, since it has a clutch, its a mess under there! Its like an electrical tape and wire loom party broke out during the making of the car! Makes it very difficult to work on. Sorry its up side down I have no clue how to rotate it, just save it to your computer and rotate it yourself I suppose.
![]()
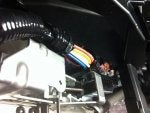
The only wires you'll need to find in the car are 12v constant, the starter wire, ignition, accessory and 2nd accessory, parking lights, lock, unlock, factory alarm disarm (I'll explain if you'll need disarm later), and the clutch wire (only on manuals obviously). For the FLCAN, you'll need CAN HIGH, CAN LOW, and key data (reference the FLCAN guide). Here is a picture of the ignition harness. White is 12v constant, yellow is the starter wire, blue is ignition, and orange and red are your accessory's. Again, sorry if the pic looks funky, no idea why it uploads differently than how its on my computer.
![]()
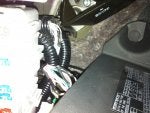
Here is a picture of the dash fuse box, again, rotated awkwardly and I'm sorry. The red wire pulled out you see will be your + parking lights.
![]()
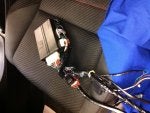
Here is a crappy picture of the harness under the fuse box going into the driver door. It needs to be rotated once clockwise for it to appear normal. The wires pulled out furthest to the right of the picture (once rotated correctly) coming out of the cut loom will be your lock, unlock, and disarm.
![]()
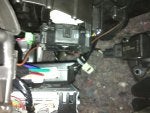
Now before I keep going, one of the biggest mistakes (or terrible methods rather) is people who are DIYing there starters, they plug everything into the unit and shove it in the car. While this works, it puts stress on the install dealing with a rats nest of wires. What I would strongly suggest doing is taking your starter and bypass, set it on your work bench, plug everything you'll need in and run your wires neatly. Take all the wires that go to a certain location, and wrap them together. Then, take the wires going from the bypass to the starter and make those connections on the bench as well. After you are satisfied, then you can mount the viper unit (brain) and run your wires accordingly. This makes it easier to install, gives you a chance to keep things away from moving parts like the steering column and pedals, and makes it nice and neat. Here is a picture of my starter before I mounted it. On just a remote start, you dont have to go crazy with the tape. But on something like this which also acts as an alarm, I would recommend taping everything you possibly can all the way up to the connection you'll be making in the vehicle. Why you ask? Because its an alarm! If someone started tampering with your car, you want everything inside to look factory installed, this way it is much harder to disable. With that, in conjunction with a brain mounted properly (meaning as hidden as possible) a thief will stand no chance! I have actually had customers before tell me that mechanics were working on there car and weren't able to even find my installation. Woot! Here is a picture of my unit before it was mounted, sorry the FLCAN is out of the picture, but as you can see I have my wires separating into different harnesses (or pigtails) and it'll be easier for me to take a harness to its location vs. having to run each wire individually.
![]()
Now with all that being said, man was it hard to find a spot to mount this beast! I ended up doing it on the right side of the factory amp, located up by the gas pedal mounted to a metal bracket. I zip tied it as high up as I possibly could, and used strip caulk to kind of stick it to the side so it wouldn't be hitting plastic to metal, making an annoying sound and potentially damaging it. Here is that picture, and you can also see the brown wire going into the grommet. This is the siren output, and the grommet was very easy to access. I would recommend using it for an amp installation as well. Once again, rotate it once clockwise and the picture will look normal. Sorry!
![]()
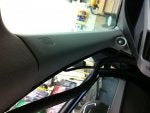
Here is the antenna mounted on the windshield. As high up and centered is going to give you the best range, which is important for my unit particularly because it is a 2-way system with a mile range, so my key fob will give me the status of my alarm within a mile. Also, here is a picture of the antenna being ran up the a-pillar. Always always always run the antenna BEHIND any airbags, that way it won't interfere with them if they have to deploy. Run the antenna neatly through the car up the pillar, and tuck any slack into the headliner. This is better for reception than bundling slack under the dash. The pillar picture needs to be rotated clockwise.
![]()
![]()
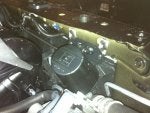
My last picture here is the siren. I had to make some brackets for it because if it was any higher the stick that holds the hood up would be putting pressure on it. Its mounted in the front left side of the engine. Always mount your sirens pointing towards the ground, that way no water or other things can build up inside it. The brown wire that I showed going through the firewall connects to the + side of the siren, and you can see where I grounded the - side of it with the blue terminal there. As you can see the wiring is loomed in 1/4" split loom. I would highly recommend the use of it, to hide your wiring and protect it from the elements. Run your wiring neatly, hiding it from sight and from anything that is moving or will get hot as the engine runs.
![]()
Ok guys, other than that, I was unable to get a picture of the clutch plug, due to the car being extremely cramped in there. And I also forgot to take a pic of the FLCAN wires you'll need and the place I grounded the starter.
For the ground, generally you'll always want to do this somewhere in the kick panel. Also, always scrape away paint and ground to bare metal. Just drilling a hole into the kick panel isn't a true/reliable ground. What I did because I'm sneaky (and slightly lazy) was pull back the weather stripping down by the kick panel, stick a flat blade screw driver in there and scraped about a dime sized area until the paint was gone, pulled back the kick panel just a little so my drill didn't scratch it, and drilled my ground in.
For the clutch - there will be two clutch plugs. You'll want the yellow one. There will be a black and orange wire. You'll want the orange one. This clutch is very easy to bypass, just send the negative (-) starter output from the brain to the wire. Generally, its about a 200ma output. Basically, the orange wire needs to see ground during crank. No relays or crazy setups needed.
For the FLCAN, once again I'm sorry but I forgot to take a pic. Thankfully, on the audiovox website they have pictures and wire colors. Everything is correct as far as info they provide.
As for the disarm wire I mentioned a while ago. Audiovox says on some models, the factory alarm will go off when you remote start it. Check out the bulletin here: The Ultimate Online Support - View topic - 2012 civic oem alarm going off with remote start
This did happen to me, so if it does take your factory alarm disarm wire from the brain and connect it to the very small gauge brown wire in the same harness as your lock and unlock wires.
Keep in mind, you'll need the audiovox usb cable to load the honda firmware onto it, so if you decide to go with my setup youll need to purchase the product as well as the usb loader.
All in all, I'd say difficulty is an 7.5/10. Please let me know if anything is unclear, but I'm sure I'll be editing this frequently. Stay posted as I'll be redoing all the audio soon as well. Thanks guys, hope this helps someone.
Before I start, Honda uses a CAN HIGH and CAN LOW system in the vehicle. This is awesome in the remote start installation world, because a product like the FLCAN is going to control a lot of the features using the cars data system vs. having to hardwire all of your connections into the vehicle. The FLCAN will work on any vehicle, it just needs to be loaded will firmware before it is programmed to the car.
Here is a link to the audiovox website, straight to the 2012 civic diagram. This diagram will work for any 2012 civic model, but there are a couple things that are actually incorrect that I had to figure out on my own, which I'll explain. FlashlogicWeblink
just click on the 'Guide' link under the FLCAN to view it. When you click on the link and view the PDF, you'll be referencing pages 5 and 6, as well as 7 for programming. As you can see, this product makes everything IMMENSELY easier. The FLCAN is going to control your locks, trunk release, arming and disarming the factory alarm, your door, hood, and trunk pins for the alarm, brake and e-brake (e-brake connection only needed for a manual transmission), as well as tachometer. IMPORTANT - tachometer is REQUIRED for a successful installation on a manual transmission - the viper MUST know when the vehicle is started. Automatic transmissions can get by with a virtual tach or a voltage sense, but I would strongly recommend using tach anyways, its only one extra wire and it provides the most accurate engine RPM monitoring vs using an alternative. Also, there are two different methods of installation - Data to Data (D2D) and Wire to Wire (W2W). D2D meaning the FLCAN and viper can talk to each other and control almost everything by plugging in a single harness between the two. W2W is connection each wire individually from the viper to FLCAN. In my personal experience, W2W is much more reliable. It is a lot of extra work, but the success rate is much much higher if done correctly. Data can sometimes fail or not send information back and forth quickly enough, resulting in it not working or acting funky. Choose what you wish, but for piece of mind I would encourage going W2W. So, I will finally begin:
First off, here is my little lady at the dealership, drove it away with 1 mile on it

Alright so you'll need to remove the driver side under dash and the steering wheel shroud. The dash is held in by clips, start at the bottom and work your way around, the last clips being the ones closest to the driver door. To remove the shroud, pull it out as far as you can, look under, and remove a silver phillips screw. After that, remove the top half and you'll see the bottom half is held in by two screws, one on each side of the wheel. Remove each one and the shroud will come right off. Here is a pic of what you'll see when youre done. On the Si, since it has a clutch, its a mess under there! Its like an electrical tape and wire loom party broke out during the making of the car! Makes it very difficult to work on. Sorry its up side down I have no clue how to rotate it, just save it to your computer and rotate it yourself I suppose.
The only wires you'll need to find in the car are 12v constant, the starter wire, ignition, accessory and 2nd accessory, parking lights, lock, unlock, factory alarm disarm (I'll explain if you'll need disarm later), and the clutch wire (only on manuals obviously). For the FLCAN, you'll need CAN HIGH, CAN LOW, and key data (reference the FLCAN guide). Here is a picture of the ignition harness. White is 12v constant, yellow is the starter wire, blue is ignition, and orange and red are your accessory's. Again, sorry if the pic looks funky, no idea why it uploads differently than how its on my computer.
Here is a picture of the dash fuse box, again, rotated awkwardly and I'm sorry. The red wire pulled out you see will be your + parking lights.

Here is a crappy picture of the harness under the fuse box going into the driver door. It needs to be rotated once clockwise for it to appear normal. The wires pulled out furthest to the right of the picture (once rotated correctly) coming out of the cut loom will be your lock, unlock, and disarm.
Now before I keep going, one of the biggest mistakes (or terrible methods rather) is people who are DIYing there starters, they plug everything into the unit and shove it in the car. While this works, it puts stress on the install dealing with a rats nest of wires. What I would strongly suggest doing is taking your starter and bypass, set it on your work bench, plug everything you'll need in and run your wires neatly. Take all the wires that go to a certain location, and wrap them together. Then, take the wires going from the bypass to the starter and make those connections on the bench as well. After you are satisfied, then you can mount the viper unit (brain) and run your wires accordingly. This makes it easier to install, gives you a chance to keep things away from moving parts like the steering column and pedals, and makes it nice and neat. Here is a picture of my starter before I mounted it. On just a remote start, you dont have to go crazy with the tape. But on something like this which also acts as an alarm, I would recommend taping everything you possibly can all the way up to the connection you'll be making in the vehicle. Why you ask? Because its an alarm! If someone started tampering with your car, you want everything inside to look factory installed, this way it is much harder to disable. With that, in conjunction with a brain mounted properly (meaning as hidden as possible) a thief will stand no chance! I have actually had customers before tell me that mechanics were working on there car and weren't able to even find my installation. Woot! Here is a picture of my unit before it was mounted, sorry the FLCAN is out of the picture, but as you can see I have my wires separating into different harnesses (or pigtails) and it'll be easier for me to take a harness to its location vs. having to run each wire individually.
Now with all that being said, man was it hard to find a spot to mount this beast! I ended up doing it on the right side of the factory amp, located up by the gas pedal mounted to a metal bracket. I zip tied it as high up as I possibly could, and used strip caulk to kind of stick it to the side so it wouldn't be hitting plastic to metal, making an annoying sound and potentially damaging it. Here is that picture, and you can also see the brown wire going into the grommet. This is the siren output, and the grommet was very easy to access. I would recommend using it for an amp installation as well. Once again, rotate it once clockwise and the picture will look normal. Sorry!
Here is the antenna mounted on the windshield. As high up and centered is going to give you the best range, which is important for my unit particularly because it is a 2-way system with a mile range, so my key fob will give me the status of my alarm within a mile. Also, here is a picture of the antenna being ran up the a-pillar. Always always always run the antenna BEHIND any airbags, that way it won't interfere with them if they have to deploy. Run the antenna neatly through the car up the pillar, and tuck any slack into the headliner. This is better for reception than bundling slack under the dash. The pillar picture needs to be rotated clockwise.

My last picture here is the siren. I had to make some brackets for it because if it was any higher the stick that holds the hood up would be putting pressure on it. Its mounted in the front left side of the engine. Always mount your sirens pointing towards the ground, that way no water or other things can build up inside it. The brown wire that I showed going through the firewall connects to the + side of the siren, and you can see where I grounded the - side of it with the blue terminal there. As you can see the wiring is loomed in 1/4" split loom. I would highly recommend the use of it, to hide your wiring and protect it from the elements. Run your wiring neatly, hiding it from sight and from anything that is moving or will get hot as the engine runs.
Ok guys, other than that, I was unable to get a picture of the clutch plug, due to the car being extremely cramped in there. And I also forgot to take a pic of the FLCAN wires you'll need and the place I grounded the starter.
For the ground, generally you'll always want to do this somewhere in the kick panel. Also, always scrape away paint and ground to bare metal. Just drilling a hole into the kick panel isn't a true/reliable ground. What I did because I'm sneaky (and slightly lazy) was pull back the weather stripping down by the kick panel, stick a flat blade screw driver in there and scraped about a dime sized area until the paint was gone, pulled back the kick panel just a little so my drill didn't scratch it, and drilled my ground in.
For the clutch - there will be two clutch plugs. You'll want the yellow one. There will be a black and orange wire. You'll want the orange one. This clutch is very easy to bypass, just send the negative (-) starter output from the brain to the wire. Generally, its about a 200ma output. Basically, the orange wire needs to see ground during crank. No relays or crazy setups needed.
For the FLCAN, once again I'm sorry but I forgot to take a pic. Thankfully, on the audiovox website they have pictures and wire colors. Everything is correct as far as info they provide.
As for the disarm wire I mentioned a while ago. Audiovox says on some models, the factory alarm will go off when you remote start it. Check out the bulletin here: The Ultimate Online Support - View topic - 2012 civic oem alarm going off with remote start
This did happen to me, so if it does take your factory alarm disarm wire from the brain and connect it to the very small gauge brown wire in the same harness as your lock and unlock wires.
Keep in mind, you'll need the audiovox usb cable to load the honda firmware onto it, so if you decide to go with my setup youll need to purchase the product as well as the usb loader.
All in all, I'd say difficulty is an 7.5/10. Please let me know if anything is unclear, but I'm sure I'll be editing this frequently. Stay posted as I'll be redoing all the audio soon as well. Thanks guys, hope this helps someone.


